
To create a natural rock fountain by your pool, you’ll need to select a stable, flat location with proper drainage and electrical access. Start by excavating the area and installing a waterproof reservoir basin. Mount your submersible pump, connect the plumbing, and position durable stones like granite or basalt to create your desired cascade effect. Add decorative gravel and aquatic plants for authenticity, then test water flow patterns. Following precise installation steps guarantees long-term stability and excellent performance.
Selecting the Perfect Location and Planning Your Layout
Three critical factors drive the perfect location for your backyard rock fountain: site stability, functional integration, and visual impact.
Begin by identifying a flat, stable surface that can support your rock formation’s weight while guaranteeing proper drainage. You’ll need proximity to electrical sources for pump installation and maintenance access. Consider prevailing wind direction to minimize unwanted spray, and analyze sun exposure patterns to control algae growth. Adding LED accent lights around the fountain base can create stunning nighttime ambiance. Use mounting blocks to secure your rocks firmly in place, ensuring long-term stability. Pre-planning for a potential custom masonry slide integration can enhance your fountain’s recreational value.
Position your fountain where it creates sight lines from main seating areas while maintaining visual unity with your pool’s edge. Map out the space using chalk outlines to visualize the layout before finalizing placement. Factor in adequate clearance for water lines and electrical wiring installation. Remember to account for future landscaping additions and make certain your chosen spot meets local safety regulations while providing unobstructed maintenance access.
Gathering Essential Materials and Equipment
Before beginning construction of your pool-side rock fountain, you’ll need to assemble three essential categories of materials: the core components (fountain stone, pump, basin, and plumbing), installation tools (drills, levels, and cutting equipment), and safety gear (protective eyewear, gloves, and dust masks). Your core components should be selected based on your fountain’s scale, with particular attention to stone weight, pump capacity (250-1000 GPH), and basin dimensions that accommodate your design. Natural stones like marble or granite provide inherent durability against outdoor elements. Proper tools and safety equipment aren’t optional extras but critical requirements for successful installation, ensuring both your protection and professional-quality results. When selecting your fountain stone, choose one with an interesting shape that will enhance the natural flow of water and create a visually appealing display. The estimated cost for all materials typically ranges from $50 to $1,000, depending on the size and complexity of your fountain design.
Core Components Checklist
Setting up a natural rock fountain requires careful preparation and gathering of specific components that work together as an integrated system. When selecting complementary natural elements, you’ll need durable stones like granite or basalt for the main structure, along with smaller river rocks and pebbles for detail work. The high water resistance of basalt makes it an excellent choice for long-lasting fountain installations. A 24-inch reservoir provides an ideal starting size for most backyard fountain projects.
Your essential equipment list must include a submersible outdoor pump that matches your desired flow rate, plus weatherproof tubing and connectors. For integrating harmonious scenery design, secure a watertight reservoir that’s properly sized for your pump and rocks. You’ll also need outdoor-rated electrical components, masonry drill bits for stone modification, and non-toxic silicone adhesive. Don’t forget finishing materials like decorative gravel and aquatic plants to improve the fountain’s natural appearance and guarantee seamless integration with your poolside environment.
Tools For Installation
Having identified your core components, proper tool selection becomes the foundation for a successful rock fountain installation. You’ll need to focus on purchasing quality tools across five essential categories for ideal results. A spray paint can will be essential for marking the designated fountain area before excavation begins. A reliable power source is crucial for operating the fountain pump system. Quality sealants like pond foam sealant provide essential waterproofing between rocks.
| Category | Primary Tools | Usage |
|---|---|---|
| Drilling/Shaping | Rotary Hammer, Feathers & Wedges | Stone modification |
| Site Prep | Shovel, Level, Tape Measure | Basin excavation |
| Waterproofing | Utility Knife, Scissors, Mallet | Liner installation |
Ensuring proper tool usage requires organizing your equipment by project phase. Start with site prep tools for excavation, proceed to drilling and shaping equipment for rock modification, then utilize waterproofing tools for liner installation. Lastly, employ plumbing tools for pump setup and finishing tools for aesthetic touches. Keep safety equipment like heavy gloves readily available throughout the installation process.
Safety Equipment Required
Safety equipment forms the critical foundation of any rock fountain installation project, requiring careful attention to five essential protection categories. You’ll need proper protective eyewear meeting ANSI Z87.1 standards, coupled with a full-face shield for high-impact tasks. Effective respiratory protection through N95-rated dust masks is indispensable when drilling or cutting stone. A properly functioning water pump system must be installed to ensure continuous water circulation and prevent stagnation. Using distilled water supply helps prevent damaging mineral buildup in your fountain components.
Since cast stone is highly porous material, waterproof protective gear becomes especially important when handling sealants and cleaning solutions. Protect your hands with cut-resistant leather or kevlar gloves, and wear long sleeves and sturdy work boots. Don’t overlook electrical safety, install GFCIs for all power tools and use only UL-listed, outdoor-rated equipment. For heavy lifting, utilize back support belts and mechanical aids while maintaining proper lifting technique. Ultimately, secure your workspace with barricades, keep tools away from the pool edge, and use protective tarps to contain dust and debris.
Preparing the Ground and Excavation
Begin your rock fountain project by carefully marking the installation area with chalk or carpenter’s pencil, ensuring you’ve accounted for the fountain’s footprint and required access points for plumbing and electrical components. You’ll need to calculate the excavation depth based on your fountain basin specifications, typically allowing for a 2-3 inch layer of drainage material beneath the reservoir. Once you’ve confirmed there aren’t any underground utilities in your work area, remove turf and soil methodically with a shovel, maintaining clean edges and uniform depth throughout the excavation zone. When choosing the location, consider installing the fountain in an area that receives adequate sunlight to accommodate any water plants you may want to add later.
Marking Your Installation Area
Before breaking ground on your rock fountain project, proper site marking establishes critical boundaries and ascertains ideal placement near your pool. Accurate perimeter marking using spray paint or a garden hose creates a clear visual guide for your excavation work. Consider the recommended diameter measurements based on your rock kit selection while maintaining proximity to an electrical outlet for the pump.
- Trace the basin outline using perimeter spray painting, following these dimensions:
- 5′ diameter for single rock kit
- 5’x7′ for two rock kit
- 8’x8′ for three rock kit
- Position pump housing mark 8″-10″ inward from edge
- Mark straight lines across stone surface using nail and straight edge
- Verify electrical outlet accessibility from marked pump location
This precise marking approach affirms proper weight distribution and prevents installation complications during later stages of your fountain project.
Proper Depth Calculations
With your installation area properly marked, accurate depth calculations set the foundation for your rock fountain’s stability and performance. Your excavation depth shouldn’t exceed your basin’s dimensions, typically 30 inches by 30 inches, to prevent future settling issues.
First, assess your soil composition to determine if supplementary stabilization is needed. You’ll want to dig precisely, maintaining a flat bottom that accommodates your basin while ensuring proper weight distribution for rocks up to 500 pounds. Calculate an extra inch of depth for the compacted base layer.
Use a level throughout the excavation process to guarantee your basin will sit perfectly horizontal. This precision prevents uneven water flow and potential overflow issues. Remember, proper depth calculations now will save you from costly adjustments later, as settling can occur if your foundation isn’t properly established.
Safe Ground Clearing Process
Every successful rock fountain installation starts with painstaking ground preparation. Before you dig, conduct thorough natural hazard identification and contact local services for locating underground utilities to prevent accidents or service disruptions. You’ll need to clear the designated area of debris, vegetation, and potential obstacles that could compromise your fountain’s stability.
- Survey and mark the installation zone with flags, ensuring a 6-12 inch buffer around the perimeter
- Remove sod layers methodically using a sod cutter, preserving viable sections for later restoration
- Excavate to precise dimensions while sifting soil for rocks larger than 1 inch
- Level and compact the exposed surface using a mechanical tamper, verifying evenness with a carpenter’s level
Once cleared, protect the foundation with terrain fabric and gravel to establish proper drainage and prevent weed growth beneath your rock fountain installation.
Setting Up the Reservoir Basin and Liner
A properly installed reservoir basin forms the foundation of your backyard rock fountain. When choosing appropriate liner material, opt for either a pre-formed high-impact plastic basin or a flexible 45-mil EPDM liner for ideal durability. For mitigating potential leaks, excavate your hole several inches deeper than needed, then create a protective sand or crushed stone base.
Position your basin in the prepared hole, ensuring it’s perfectly level from all angles using a carpenter’s level. You’ll need to backfill gradually while checking for stability at regular intervals. Install a French drain system around the reservoir’s perimeter, a 2-3″ deep trench filled with drainage stone, to prevent silt contamination. Secure the liner edges with gravel or pavers, and extend flexible liners beyond the basin rim to accommodate settling and overflow.
Installing the Pump System and Plumbing

Begin your fountain’s heart by positioning a submersible pump at the basin’s deepest point, 8-10 inches from the nearest edge for ideal accessibility. You’ll need to connect flexible PVC tubing from the pump to your rock features, ensuring a minimum 6-inch insertion depth into each drilled stone. Install control valves on your plumbing lines to precisely regulate water flow and achieve your desired fountain effect.
Pump Placement and Setup
The proper installation of your pump system forms the cornerstone of a successful rock fountain project. When placing your submersible pump, you’ll need to prioritize both functionality and safety, ensuring proper submersion depth while avoiding electrical hazards through GFCI-protected outlets.
- Position your pump housing 8″-10″ from the excavation edge, ensuring it’s near an electrical outlet while maintaining easy access for future maintenance
- Install the pump flat on the housing bottom, keeping it submerged under at least 12″ of water
- Route the power cord through the designated housing opening, protecting it from water contact and pinching
- Connect your PVC or vinyl flex hose to the pump’s outlet using appropriate barbed fittings, then install a flow control valve for precise water flow adjustment
Connecting Water Flow Lines
With your pump properly positioned, proper water flow line installation becomes your next engineering focus. Start by calculating pipe diameters based on your pump’s output capacity and fountain design. You’ll need to map the most efficient path for routing water pipes from the pump to each rock feature.
| Component | Specification | Installation Method |
|---|---|---|
| Main Line | 1/2″ – 1″ PVC | Use gentle curves |
| Fittings | Barbed/NPT | Apply Teflon tape |
| Valves | Ball/Control | Install per branch |
Cut your flexible PVC pipes to precise lengths, allowing extra material for adjustments. Install T-fittings or manifolds to split water flow between multiple rocks. Secure all connections with PVC cement and verify each joint’s integrity. Don’t forget to integrate a float valve system for automated filling, positioning it near the basin rim. Test the entire system for leaks before finalizing your installation.
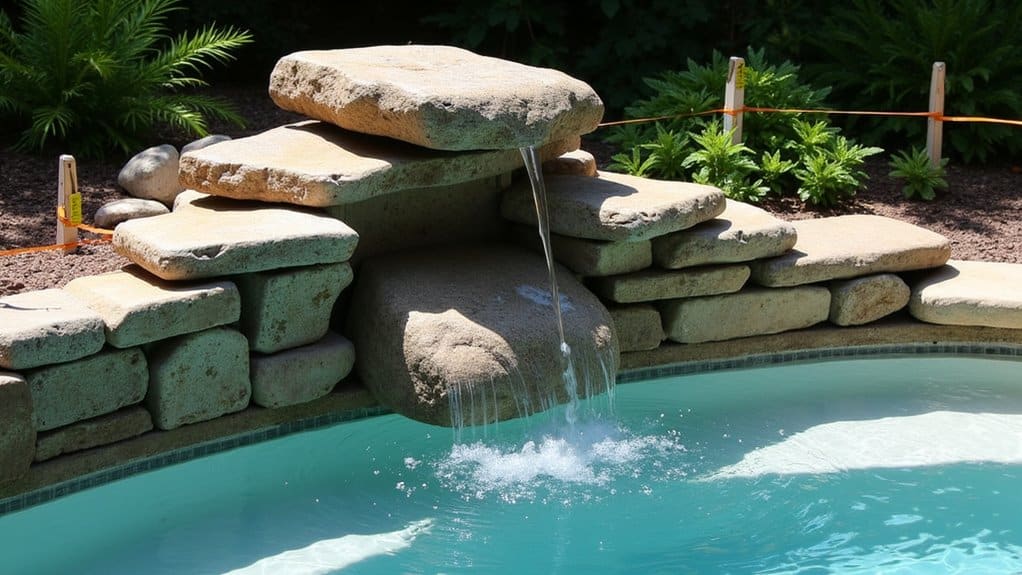
Positioning and Securing Your Boulder
Successfully positioning your boulder requires precise planning and careful execution to achieve both stability and visual appeal. For ideal security and aesthetics, you’ll need to bury approximately one-third of the rock below ground level while ensuring even weight distribution across the base.
- Excavate the designated area to proper depth, then use a hand tamper to compact the soil thoroughly before securing the rock against shifting
- Position the boulder with its most attractive face toward main viewing areas, aligning any pre-drilled holes with your water source
- Reinforce the rock base using river rock or gravel to fill gaps and create a natural-looking incorporation
- Verify the boulder’s stability by checking all angles, ensuring water will flow along natural contours without excessive splash-out
When properly secured, your boulder fountain will become a lasting focal point that seamlessly integrates with your pool setting.
Connecting Water Lines and Testing Flow
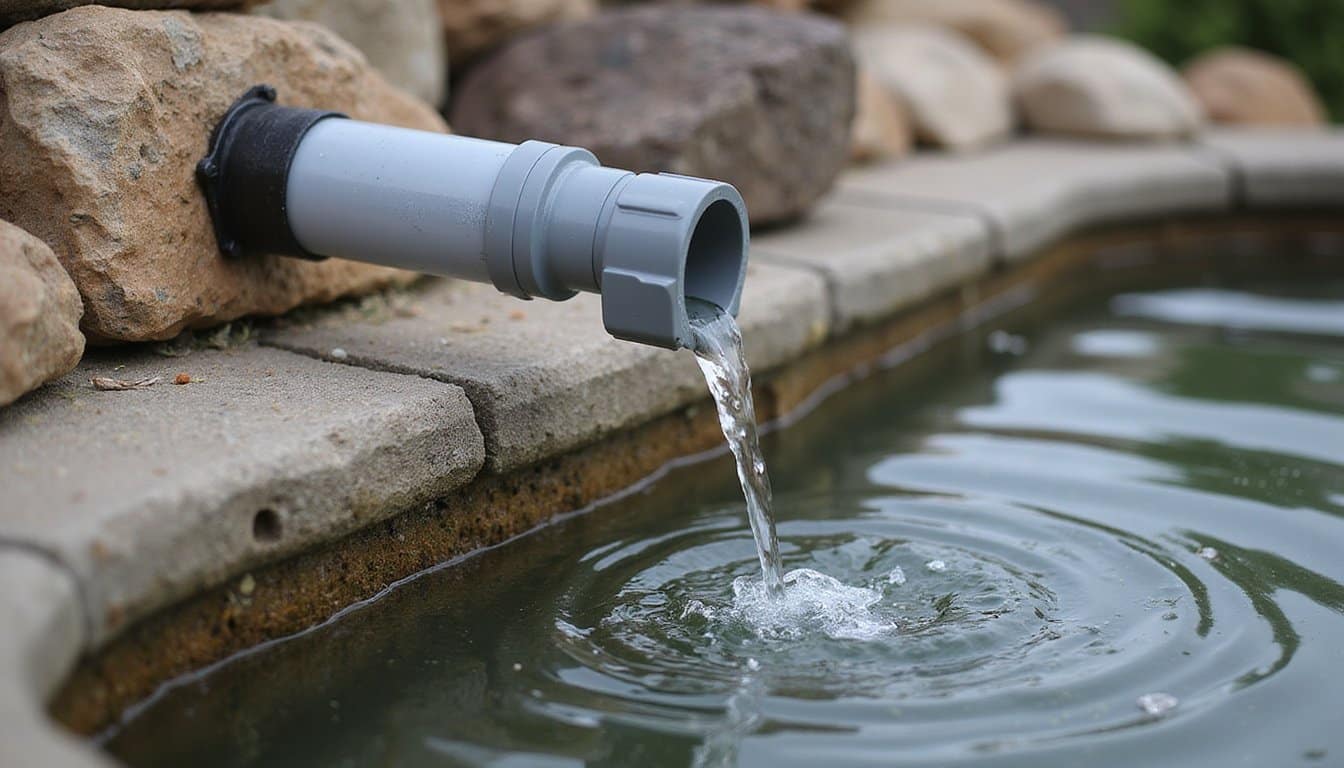
Once your boulder is properly anchored, connecting the water lines and testing flow patterns demands careful attention to detail and systematic assembly. You’ll need to trench a water line from your source to the basin edge, drilling a 3/4″ hole near the top for connection. Install your submersible pump in the housing, ensuring the power cord reaches an exterior outlet.
Connect flexible PVC piping from the pump to your drilled rock, using Teflon tape on threaded adapters and PVC cement for leak-free joints. When troubleshooting common issues, check for kinks in the lines and proper valve positioning. For ensuring water distribution efficiency, install ball valves at the manifold to regulate flow to each rock. Test the system by filling the basin, checking for leaks, and adjusting flow rates until you achieve your desired water effect.
Adding Decorative Rocks and Final Touches
The strategic placement of decorative rocks transforms your fountain into an engaging focal point while ensuring ideal water flow dynamics. Select a mix of river rocks and flat stones in harmonious colors, arranging larger boulders as anchoring elements and smaller stones for detailed accents. You’ll want to create varied levels that guide water movement while maintaining visual balance.
- Layer rocks strategically from bottom to top, ensuring stability and proper water direction
- Position flat stones at cascade points to create gentle water sounds
- Add planting complementary greenery like ferns between rock formations
- Install incorporating soothing lighting with LED fixtures to highlight key features
Fine-tune the rock placement by testing water flow patterns and adjusting stones until you achieve the desired sound and visual effect. Regular maintenance, including algae prevention and stone cleaning, will preserve your fountain’s natural beauty.
Running Initial System Tests and Adjustments
Before powering up your fountain system, conducting methodical tests and adjustments guarantees optimal performance and longevity. Start by verifying your water reservoir’s level and ensuring the pump’s secure connection to a GFCI-protected outlet, avoiding electrical hazards. Check all tubing connections and remove any debris from the intake.
Power on the system and immediately assess water flow patterns, adjusting ball valves for balanced output. Listen carefully for unusual pump sounds while minimizing unintended noise through proper positioning. Address any splashing by repositioning rocks and using pond foam to direct water flow naturally. Monitor for leaks at connection points and maintain perfect water levels.
Complete your testing by documenting flow settings and verifying electrical components function correctly. Make final adjustments to achieve the desired aesthetic while ensuring safe, efficient operation.
Understanding Regular Care and Seasonal Maintenance
After completing your initial system tests, maintaining your backyard rock fountain requires a structured care regimen to safeguard its beauty and functionality. Focus on preventing common equipment failures through consistent monitoring and optimizing water chemistry with proper water treatment protocols.
- Clean your fountain’s basin and pump every 1-3 months using soft brushes and mild detergent to prevent algae buildup and mineral deposits
- Top up water levels routinely, using filtered or softened water to protect pump operation and minimize scale formation
- Service your pump monthly by disassembling components and cleaning with vinegar solution, especially in hard water areas
- Winterize your fountain before first frost by draining completely, storing the pump indoors, and covering the structure with breathable material
Apply stone sealers annually and inspect for wear frequently to guarantee long-term durability and performance.
Frequently Asked Questions
Will a Rock Fountain Attract Mosquitoes to My Backyard?
Your rock fountain won’t attract mosquitoes if you maintain proper water movement and follow essential water feature maintenance protocols. Install cascading elements or jets to create constant agitation, preventing larvae development. You’ll need to clean the fountain weekly, remove debris, and guarantee the pump operates continuously. For added protection, surround your fountain with mosquito deterring plants like citronella, lavender, or marigolds to naturally repel adult mosquitoes.
How Much Does Professional Installation Typically Cost Compared to DIY?
You’ll typically spend $1,100-$15,000+ for professional installation, while DIY approaches range from $500-$6,000 for comparable features. Contractor labor costs average $50-$150 per hour, with standard projects averaging $2,847. Your DIY material expenses start around $100 for basic kits and can reach $2,500 for larger models. However, complex custom rock features requiring specialized plumbing and electrical work are best left to professionals, where costs can exceed $20,000.
Can I Use Saltwater in My Rock Fountain?
You’ll need to be extremely cautious using saltwater in your rock fountain due to significant saltwater corrosion concerns. Unless you’re using specially-rated materials, salt will aggressively deteriorate natural stones and standard fountain components. You’ll also face challenges with mineral deposits buildup on surfaces. If you proceed, invest in salt-resistant synthetic rocks or professionally sealed natural stones, and guarantee all equipment, including pumps and fittings, is specifically rated for saltwater use.
What’s the Average Monthly Cost Increase on My Electricity Bill?
Your monthly energy costs will typically range from $16-$33 for a pool-adjacent rock fountain, based on standard electricity usage trends. If you’re running a medium-sized pump (1000-2000 GPH) for 24 hours daily, you’ll see around $16-$17 added to your bill. For larger features with 300-watt pumps, expect closer to $32-$33. You can reduce these costs by installing timers or operating during off-peak hours.
How Many Years Will My Rock Fountain Last Before Needing Replacement?
With proper maintenance requirements, your rock fountain will last 20-30 years. You’ll optimize this lifespan expectancy by cleaning it every 1-3 months, sealing the stone annually, and performing regular pump maintenance. However, if you’re experiencing harsh freeze-thaw cycles or heavy chemical exposure from your pool, you might need replacement sooner. Watch for structural cracks, persistent leaks, or foundation instability as these indicate it’s time for replacement.