A fiberglass pool shell is a one-piece structure you’ll receive fully manufactured from the factory, ready for installation. It’s built by applying alternating layers of marine-grade fiberglass and vinyl ester resin over a precision-crafted mold. Technicians start with gel coat application, then add chopped strand mat and woven roving for structural integrity. After controlled curing, the shell undergoes rigorous quality inspection before shipping. Understanding each manufacturing step reveals why these pools outperform alternatives.
Understanding the Fiberglass Pool Shell

When you’re considering a fiberglass pool, understanding the shell’s construction gives you insight into why these pools perform so well. The shell consists of a one-piece, factory-manufactured structure created from layers of high-quality fiberglass and specialized resins. Glass fibers are heated and drawn through superfine holes, then woven into swatches that form the structural backbone.
The material properties of this composite make it lightweight yet stronger than many metals by weight. Marine-grade fiberglass provides flexibility and strength, while premium vinyl ester resin creates a waterproof barrier against osmosis and stress cracks. The manufacturing process occurs in controlled environments, ensuring consistent quality that’s impossible to achieve with on-site construction methods. This precision results in a corrosion-resistant shell unaffected by continuous water exposure. The smooth, non-porous surface gel coat not only provides aesthetic appeal but also resists algae growth, significantly reducing cleaning time and chemical requirements. Because the material is completely non-toxic, homeowners can feel confident about the safety of their swimming environment. After manufacturing, each pool shell undergoes quality inspection to check for cracks, blemishes, and weight consistency before shipment.
The Design Phase and Digital Modeling
Before manufacturing begins, every fiberglass pool starts with meticulous design specifications that dictate the shell’s final form. You’ll collaborate with your pool designer to establish shape, size, depth, and integrated features like entry steps and seating arrangements. This pool design workflow guarantees your vision translates into a structurally sound product.
Advanced software creates detailed digital models serving as manufacturing blueprints. The 3D modeling benefits include:
- Precise capture of every structural element and contour
- Streamlined production with minimized construction errors
- Accurate pattern development for mould creation
- Optimized functionality and aesthetic outcomes
- Direct shift from digital design to fabrication
From these models, builders construct physical patterns using filler, fiberglass, primer, and timber, a process requiring three to six months before mould production begins. This thorough planning upfront ensures that every specification is precisely outlined, reducing costly modifications during the manufacturing stage. The pattern serves as the foundational element that determines the design, shape, and size of your finished fiberglass pool. Pool builders may use specialized software or 3D modeling to present various design options, helping you visualize exactly how your completed pool will look in your backyard.
Mold Preparation and Gel Coat Application
Although the digital design establishes your pool’s specifications, the mold preparation process transforms those blueprints into a physical production tool capable of creating hundreds of identical shells.
Technicians craft the plug from MDF wood, then sand and polish it to a glossy finish. They apply multiple gelcoat layers, using laser levels to maintain 1/8-inch tolerance precision. Pattern making typically takes 3-6 months to complete before mold production can begin.
Next comes PVA application, one thin coat followed by two thicker coats, guaranteeing 2-4 mils of dry film thickness. Detailed finish layers require uniform surface application of tooling gelcoat at minimum 30 mils thickness. The room environment must be carefully controlled, as optimal temperatures of 70-80°F ensure proper resin curing throughout the layup process.
Workers buff the surface with 1000-grit and 2000-grit compounds, then apply specialized sealers and release agents. This meticulous preparation verifies defect-free shell separation and enables indefinite production capability with proper maintenance.
The Layering Process and Material Selection
Once the mold preparation is complete, the layering process begins with a critical first application: chopped fiberglass saturated with vinyl ester resin directly over the gel coat. This initial layer creates your watertight barrier against osmotic blistering. Proper resin viscosity adjustment guarantees complete saturation of the fiberglass mat composition.
The vinyl ester barrier coat is your hull’s first defense against water intrusion and long-term osmotic damage.
Subsequent layers alternate between chopped strand mat and woven roving, each hand-laid for ideal adhesion:
- 1.5 oz chopped strand mat for surface skinning
- 24 oz woven roving at stress points for reinforcement
- Alternating weave directions for structural integrity
- Minimum 48 oz per square yard woven roving throughout
- Sequential layer fusion for maximum strength
You’ll find polyester resin used in outer layers after the vinyl ester barrier’s established. Each layer’s rolled to eliminate air bubbles and checked for consistent thickness. The use of modified epoxy vinyl ester resin provides increased impact strength and long-term water protection compared to standard materials. Many critical areas of the shell incorporate more than 72 oz per square yard of woven roving to handle additional structural demands.
Curing and Demolding the Pool Shell
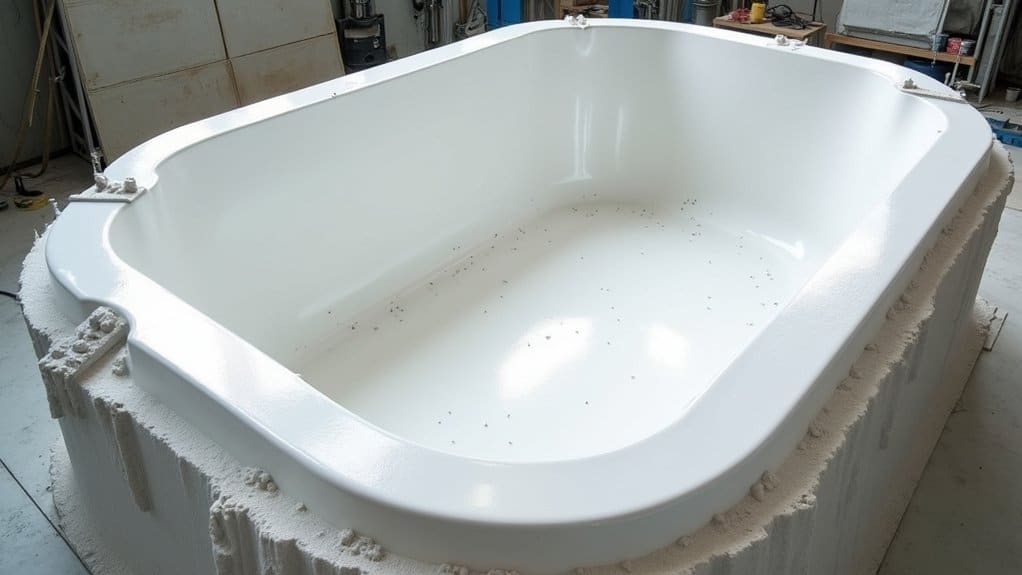
Once layering completes, you’ll move the pool shell to a controlled curing area where precise temperature and humidity levels guarantee proper chemical reactions between the fiberglass and resin. Similar to gunite pools, proper curing is essential for long-term strength and durability of the shell structure. The manufacturing facility maintains strict quality procedures, ensuring each shell meets weight specifications before advancing to the next stage. After at least one day of curing, technicians attach chains to lift the hardened shell from the mold, placing it on foam blocks for the next phase. Your quality team then conducts exhaustive inspections to verify structural integrity, surface finish, and the absence of defects before the shell advances to trimming and final preparation. These inspections follow a multi-point checklist similar to those used during final pool installation to ensure every component meets rigorous standards.
Controlled Curing Conditions
Several critical environmental factors determine whether a fiberglass pool shell achieves its full structural potential during the curing phase. Manufacturers maintain regulated temperature parameters throughout the factory to guarantee gelcoat and vinyl ester resin layers harden correctly. Controlled moisture management prevents osmotic blisters and surface defects that compromise long-term durability.
You’ll find that precision environmental control directly impacts shell quality:
- Ideal temperature ranges guarantee consistent catalyst reaction speeds
- Humidity regulation prevents bubbling and layer separation
- Level, reinforced molds support uniform curing across the shell
- Controlled conditions eliminate laminate defects
- Conducive environments strengthen resin solidification
The curing process requires at least one day in the mold. During this period, the vinyl ester barrier layer must harden thoroughly before demolding to assure watertight integrity and structural soundness. This meticulous process contributes to the shell’s exceptional durability, ensuring the pool remains resistant to cracking, chipping, or scaling for decades. After careful removal from the mold, each pool shell undergoes rigorous quality control inspections to verify it meets manufacturing standards before leaving the facility.
Shell Removal Process
The controlled factory environment that produces a properly cured shell also enables precise demolding procedures that guarantee your investment.
Shell Extraction Procedures
Once curing completes, technicians rig the pool shell with specialized straps positioned at calculated stress points. You’ll find that proper strap placement prevents flexing or cracking during the lift. An overhead crane or gantry system then raises the shell vertically from its mold, maintaining even weight distribution throughout extraction.
Equipment Considerations
Factory demolding requires specific machinery rated for fiberglass handling. Technicians use padded contact points to prevent gel coat scratches. The extraction process demands precise coordination, operators monitor shell flex during lifting and adjust tension accordingly. After removal, workers inspect the shell for imperfections before transport staging. This systematic approach confirms your fiberglass pool arrives structurally sound and cosmetically flawless. Should homeowners later decide to remove their fiberglass pool, the full removal process takes 3 to 7 days of active work to complete.
Quality Inspection Standards
Every fiberglass pool shell undergoes rigorous inspection protocols before leaving the manufacturing facility. You’ll find technicians examining both interior and exterior surfaces after thorough washing to assess surface finish quality and structural integrity.
Quality control teams verify:
- Consistent thickness throughout hand-laid fiberglass layers
- Proper woven roving reinforcement at critical stress points
- Absence of cracks, blemishes, or laminate inconsistencies
- Crisp, clean edges following overlay trimming
- Dimensional tolerances within specified parameters
Inspectors assess the gelcoat for osmotic blister resistance and confirm the vinyl ester barrier layer maintains watertight integrity. They’ll check for potential delamination risks stemming from resin quality issues. The shell must demonstrate designed shape maintenance under stress conditions. Only after passing these extensive checks does the pool shell receive clearance for shipping to your installation site.
Quality Inspection and Shipping
Once your pool shell releases from the mold, you’ll conduct a thorough quality inspection that verifies gelcoat integrity, laminate adhesion, and crisp edge definition after trimming. You’ll check all integrated components, including pre-formed plumbing openings, structural reinforcements at stress points, and the watertight vinyl ester barrier that prevents osmotic blistering. After confirming dimensional accuracy against manufacturer specifications, you’ll prepare the shell for transport using foam block supports and specialized lifting equipment.
Post-Demolding Shell Inspection
After curing completes and the pool shell releases from its mold, technicians immediately begin the post-demolding inspection sequence that determines whether the unit meets production standards. You’ll find that shell integrity testing occurs through light transmission methods, where sunlight passing through the laminate reveals thin spots or inconsistencies in gel coat application.
Quality assurance documentation tracks every observation, from spider cracks at stress points like copings to red flecks indicating mold degradation from repeated production cycles.
Key inspection checkpoints include:
- Gel coat thickness verification using backlit evaluation
- Spider crack assessment at tanning ledge edges and coping shifts
- Honeycomb core integration confirmation
- Surface buffing verification for defect-free finish
- Manufacturing imperfection identification and notation
Technicians flip the shell to access interior surfaces, ensuring thorough evaluation before clearing units for shipping preparation.
Integrated Components Verification
Before clearing a fiberglass pool shell for transport, technicians verify that all integrated components meet exact specifications for seamless on-site installation. You’ll find inspectors examining pre-molded plumbing openings to confirm alignment with standard connection points. They check electrical conduits and light housings for proper positioning while guaranteeing built-in features like steps, benches, and spas remain securely attached.
Your shell undergoes mechanical system compatibility testing where filtration pre-plumbed ports are verified against industry-standard equipment. Hydrostatic relief valves receive operational checks to confirm accessibility and pressure regulation. Technicians document regulatory compliance documentation throughout this phase, recording measurements and test results that installers will reference during setup. This verification process validates every component functions correctly before the shell leaves the manufacturing facility, eliminating costly field modifications and installation delays.
Shipping Preparation Process
Precision defines the shipping preparation process, where every fiberglass pool shell undergoes rigorous quality inspection before leaving the manufacturing facility. You’ll find that transportation logistics require specialized carriers designed specifically for these large composite structures.
Before dispatch, technicians verify these critical elements:
- Unique 5-digit tracking number assignment for quality control documentation
- Pre-formed plumbing connection openings properly finished and protected
- Shell weight confirmation within 5% of design specifications
- Surface integrity validated through final visual and structural assessment
- Compliance certification with ANSI/APSP-5 standards for Type O pools
Placement coordination involves planning crane access points at your installation site. The lightweight fiberglass construction facilitates easier handling during conveyance. Your contractor receives documentation for leveling requirements and backfilling materials needed post-delivery, ensuring seamless move from factory to installation.
Key Advantages of Fiberglass Pool Shells
When you’re evaluating pool construction options, fiberglass shells stand out for their exceptional durability and longevity in demanding conditions. The resilient material withstands temperature fluctuations, weathering, and soil movement without cracking, lasting decades without major resurfacing.
Fiberglass pools deliver unmatched resilience, handling extreme temperatures, ground shifts, and harsh weather for decades without compromise.
You’ll benefit from low maintenance requirements since the non-porous gelcoat resists algae growth and staining. This eliminates acid washing and reduces chemical usage, delivering eco friendly advantages through decreased resource consumption.
The smooth surface provides customization flexibility with integrated steps, benches, and tanning ledges molded directly into the shell. You won’t need costly custom additions later.
Energy efficiency proves substantial, insulating properties retain heat while the smooth finish reduces pump friction. Though upfront costs exceed vinyl, reduced repairs, maintenance, and energy consumption generate significant lifetime savings.
Why Fiberglass Outperforms Other Pool Types
Fiberglass pool shells deliver measurable performance advantages over concrete and vinyl alternatives across every critical metric. You’ll experience reduced maintenance costs under $5,000 over 10 years, while concrete requires acid washing and resurfacing, and vinyl demands liner replacement every 7-10 years.
Enhanced energy efficiency comes from fiberglass’s superior insulation properties, cutting your heating costs up to 25%. The non-porous gelcoat surface minimizes chemical consumption and prevents algae growth.
Key performance differentiators include:
- Installation completed in 1-2 weeks versus 2-6 months for concrete
- Flexible construction resists cracking during ground movement and freeze-thaw cycles
- Gelcoat finish withstands UV exposure, salt corrosion, and fading
- Eliminates recurring resurfacing and liner replacement expenses
- Decades-long lifespan with minimal intervention required
Frequently Asked Questions
How Long Does a Fiberglass Pool Shell Typically Last?
Your fiberglass pool shell lifespan typically ranges from 25 to 50+ years, with most averaging 25 to 30 years under standard conditions. You’ll extend this markedly when you follow proper maintenance requirements, monitoring pH levels weekly (7.2-7.6), maintaining alkalinity at 80-120 ppm, and keeping calcium hardness between 200-400 ppm. Well-maintained shells from the 1980s remain operational today, demonstrating that quality manufacturing combined with consistent chemical balance delivers decades of reliable performance.
Can Fiberglass Pool Shells Be Customized After Factory Manufacturing?
You can’t make structural pool shell modifications after factory manufacturing since the pre-molded design is fixed. However, you’ll find customization options available during on-site installation. You can add water features, lighting, tile accents, and elevation adjustments around the delivered shell. Plumbers install filtration systems externally for easy access. If you need surface updates later, technicians can apply gelcoat resin resurfacing. Pre-manufacturing remains your window for built-in features like benches, tanning ledges, and entry configurations.
What Is the Average Cost of a Fiberglass Pool Shell?
You’ll typically pay between $4,500 and $30,000 for a fiberglass pool shell, with most homeowners spending around $36,800. Size greatly/substantially/considerably impacts pricing, small pools under 26 feet run $10,000 to $19,000, while larger models exceed $27,000. Your total pool installation costs will increase by $10,000 to $20,000 for professional setup. Factor in maintenance requirements too, though fiberglass demands only $600 to $1,200 annually, lower than concrete alternatives.
Are Fiberglass Pool Shells Suitable for Cold Climates With Freezing Temperatures?
Yes, fiberglass pool shells deliver excellent cold weather durability for freezing climates. Their freeze resistant construction allows the flexible shell to expand and contract through freeze-thaw cycles without cracking. The vinyl ester resin barrier prevents moisture penetration that causes damage in cold temperatures, while reinforced fibers withstand ground shifts from frost heave. You’ll need proper installation with precise leveling and professional site preparation to guarantee long-term stability in freeze-prone regions.
Can a Damaged Fiberglass Pool Shell Be Repaired On-Site?
Yes, you can repair a damaged fiberglass pool shell on-site using specialized on site repair techniques. You’ll apply marine-grade bond coat, fiberglass cloth reinforcement, and polyester putty to address cracks and fissures effectively. For minor damage, you can use DIY repair kits with resin and hardener. However, you should schedule professional inspections when you notice persistent water loss, spider-webbing cracks, or soft spots indicating structural compromise requiring expert intervention.